10 VSCode Practices to Hasten Your React Development Flow

We will be going over my VSCode settings that enhance my development for react apps such as extensions, snippets, keyboard shortcuts, and configuration settings.
If you're a Visual Studio Code user and love to develop projects in react, then you've probably been experiencing plenty of annoying repetitive code like React.useState, React.useContext, React.useReducer(reducer, initialState), and so on.
These individual keys are scattered in all different directions on the keyboard and it can become irritating having our poor little fingers write these characters over and over in all of our react projects.
If you type React.useState on your keyboard, your finger tips will go in these directions:

I may be acting overdramatically to this simple issue, but my point for this post is not about keystrokes. It's about keystrokes and lots of other things when we develop apps with react today. I've learned that we should take advantage of all the opportunities available to us as much as we can to mitigate unnecessary stress because our health and time are precious.
With that being said, I wanted to take the time to write this post to help react developers like you and I find ways to preserve as much time and energy as possible by informing you of useful ways you can use to hasten your react development flow!
1. Extension: User Snippets
I've seen many great things happen as react developers in the history of its existence, and User Snippets is one of them.
This handy VSCode extension allows you to define your own custom snippets that you can reuse an infinite number of times throughout your projects just by pressing a couple of letters.
I work at a company that is having their platform built with react, and to my surprise there were some people who were developing in react react without knowing that this feature even existed.
So what does it do?
This feature lets you create any custom snippet that you can generate right on top of your code just by typing a couple of letters (which you declare with a custom prefix).
For example, when we create a new component that is going to use the React.useReducer API, we'd probably have to declare an initial state , a reducer function, and something like [state, dispatch] = React.useReducer(reducer, initialState) at minimum to make it happen:
const initialState = {
  //
}

function reducer(state = initialState, action) {
  switch (action.type) {
    default:
      return state
  }
}

function MyComponent() {
  const [state, dispatch] = React.useReducer(reducer, initialState)

  return <div />
}
You can save precious time and energy by putting this into your user snippets like below:
{
  "my React.useReducer snippet": {
    "prefix": "rsr",
    "body": [
      "const initialState = {",
      "  //$1",
      "}",
      "",
      "function reducer(state = initialState, action) {",
      "  switch (action.type) {",
      "    default:",
      "      return state",
      "  }",
      "}",
      "",
      "function MyComponent() {",
      "  const [state, dispatch] = React.useReducer(reducer, initialState)",
      "  ",
      "  return <div />",
      "}"
    ]
  }
}
All you have to do is press rsr and this code will automatically be written out for you:
Here are some common snippets I like to use throughout my react projects:
Quickly testing CSS elements to see if they look right by giving them temporary borders:
{
  "border test": {
    "prefix": "b1",
    "body": "border: 1px solid red;"
  },
  "border test2": {
    "prefix": "b2",
    "body": "border: 1px solid green;"
  },
  "border test3": {
    "prefix": "b3",
    "body": "border: 1px solid magenta;"
  },
  "border test4": {
    "prefix": "b4",
    "body": "border: 1px solid blue;"
  },
  "border test5": {
    "prefix": "b5",
    "body": "border: 1px solid #fe7200;"
  }
}
I usually have a components folder with generic primitive components like Button for example, in every project:
{
  "import Button from 'components/common/Button'": {
    "prefix": "btt",
    "body": "import Button from 'components/common/Button'"
  }
}
Setting up / cleanup something before each test:
{
  "beforeEach(() => {})": {
    "prefix": "bfe",
    "body": ["beforeEach(() => {", "  $1", "})"]
  }
}
Some quick line disablers:
{
  "// @ts-ignore": {
    "prefix": "tsg",
    "body": "// @ts-ignore"
  },
  "eslint disable line": {
    "prefix": "eds",
    "body": "// eslint-disable-line"
  }
}
Importing react:
{
  "import react": {
    "prefix": "reaa",
    "body": "import React from 'react'"
  }
}
This isn't a full list of snippets I use but I hope it makes you understand how much time and energy you can save by taking advantage of User Snippets.
Bonus: Take it up to the next level with Project Snippets, a VSCode that provide the same functionality except in the workspace level.
2. Extension: Prettier
If you aren't using prettier, then please, I am begging you to drop everything and use it.
3. Extension + Package: TypeScript + ESLint
Approximately four years ago when Promises oficially made its way into the ECMAScript 2015 Specification, the react ecosystem was booming of revolutionary technology that changed how we develop web apps today.
TypeScript at this time was among them as it was making its way into the react ecosystem and gradually became widely adopted in the community to this day--and for good reasons!
TypeScript is such a powerful tool that allows you to save plenty of time and energy before potential bugs even have a chance to happen.
In addition to the features it normally provides, it helps document your react components, prevent future bugs from happening and teaches you a lot about the JavaScript language itself without you having to spend a single dime on an ebook to learn weird stuff in the language.
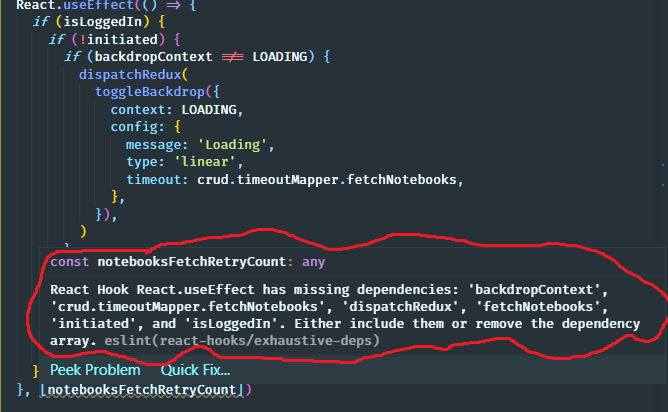
Adopting TypeScript with ESLint into your react projects will help you in situations where we become oblivious to how react works:
4. Shortcut: Duplicate Line Up/Down
Ctrl + D will save a lot of your time.
5. Shortcut: Find All Occurrences in the Current File
Highlighting a keyword of your choice in a file and pressing Ctrl + Shift + L will select all occurrences of the keyword.
This is useful when you want to rename a component because apparently we always have at least three occurrences when a component has children:
import React from 'react'

function App() {
  return <h2>Useful content</h2>
}

function Root() {
  return (
    <App>
      <p>Will I even be rendered?</p>
    </App>
  )
}
If we want to rename App to something else we have to select the component declaration as well as the two occurrences in the Root render block.
6. Shortcut: Find a File in Your Project
It can easily become frustrating having to use the File Explorer all the time when you're looking for a specific file. This becomes a huge issue when you want to analyze a file in the node_modules directory because VSCode does this to you:
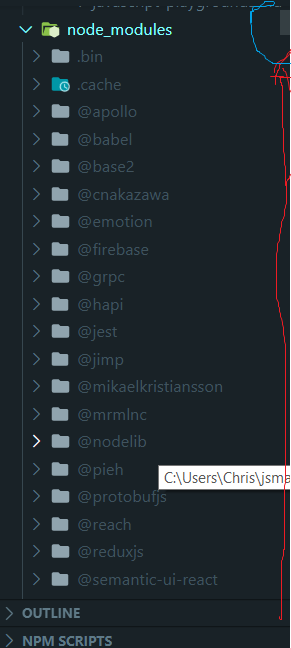
The red line indicates how much content you have left to scroll over, and the blue indiciates the size of the scroll bar that shrinks the more content there is. This impacts performance when expanded.
You can easily find and open a file that is located anywhere in the project by searching its name without having to move a single millimeter from your mouse.
Simply press Ctrl + T, type in the file name and you're done.
7. Extension: Custom TODO highlights
This is an extension that may seem valuable for fun use, but it has become such a powerful tool to me over time in serious environments.
First of all, it is incredibly important to write down todos somewhere as long as you're able to be reminded of something. It can be on the Evernote app, your composition book, a ripped piece of paper, and so on. If you use TODO Highlights like I do, you're putting todos right on top of code you're writing on in comments. It's incredibly useful with the TODO Highlights extension used in conjunction because they become color coded on the screen when you prefix a line with TODO: like below:

But the power of TODO Highlights begins to shine more as you begin creating your own custom keywords and color effects to them:

This has become a valuable feature because I'm able to quickly regain focus as well as an understanding of what is going on in each file no matter where I turn back to.
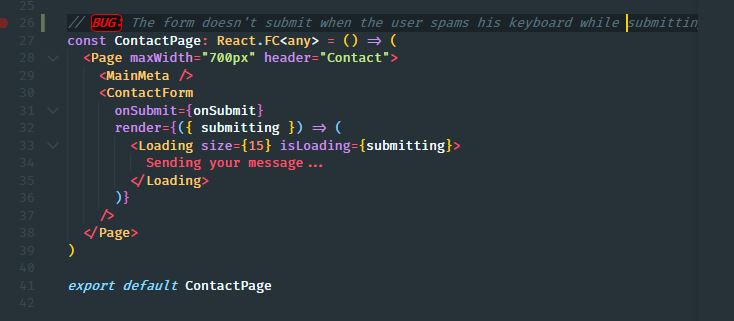
My favorite todohighlight keyword is BUG: since it's red. We normally associate red with errors or something dangerous so this easily catches my attention on critical parts of my code:
8. Extension: (Any cool theme in the Visual Studio Marketplace)
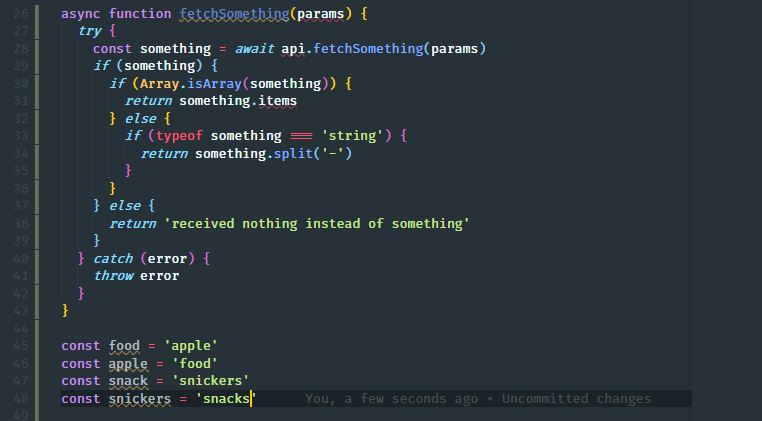
Developing react apps in conjunction with a cool VSCode color theme has been a critical asset in keeping me entertained resulting in better quality code.
It's incredibly important to use a theme you like because the color codes of your react components have a certain "look" or "feel" to them which will help you have a easier time developing your react apps, as we can see below:
Non-components
Components
9. Extension: ES7 React/Redux/GraphQL/React-Native snippets
This will be very helpful to you.
I personally don't use this anymore because I use my own snippets. But in the past it made an immense positive impact on my development workflow.
10. Feature: Breadcrumbs
Boy, time sure does fly by fast! It feels like yesterday when breadcrumbs was released in VScode.
This continues to give me an easier time when developing in react, in times I least expect it to.
Given the nature of react's component children/parent hierarchy, this just so happens to go along well when developing in react (as long as you built your directory structure according to a hierarchy) because it basically shows you that a component file was derived from the parent directory (which in most of my cases is always a component that is default exported from an index.tsx file):
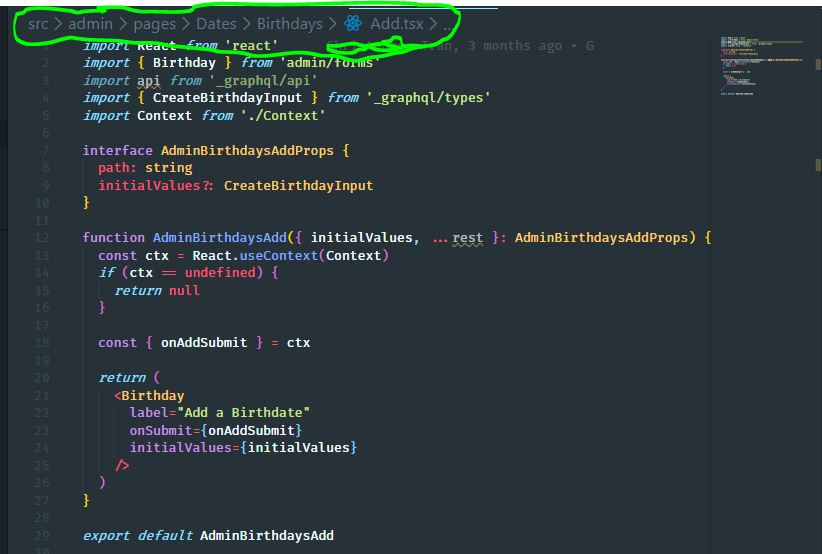
The breadcrumbs above shows me that Add is a child of Birthdays which is a child of Birthdays which is a route in the Admin component.
Breadcrumbs are enabled by default. But the point is to not take the breadcrumbs feature for granted. It silently becomes helpful in unexpected ways, so put more of your attention to it!
Bonus: Some breadcrumbs tips and tricks for the interested.
Conclusion
And that concludes the end of this post! I hope you found this to be valuable and look out for more in the future!
