Enhance Your React App With Undo and Reset Abilities
June 23rd, 2019
Share This Post
Ever developed something where you made mistakes and wished there was an undo feature? What about reset?
Luckily there is always undo or reset capabilities in software we use. I'm talking ctrl + z in vscode, or commonly in the 90s a reset button in forms.
Why do we even need them? Well, because humans always make mistakes. Whether it is a typo or wrong wording in a written essay, we need some way to undo something. When you think about it though, there are ways to undo something almost everywhere. Pencils have erasers, phones have capabilities to be taken apart, users are given the option to reset their passwords, erasable pens rubbing their ink away--the list goes on.
But what about implementing an undo or reset feature as a developer for an application? Where do you start? Where should you look for advice?
Well, look no further because I am here to show you how to enhance your application with undo and reset capabilities! You will find out from this article that it isn't that hard to implement and you can do it too.
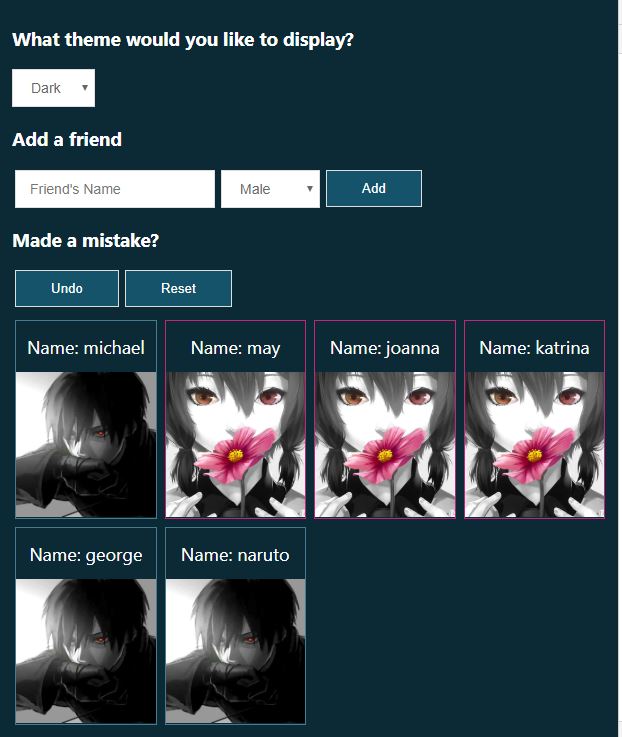
What we'll be building is a user interface where users are able to add their friends by name and specifying their friend's gender. As friends are inserted, cards will be appended to the screen displaying the information the friend was registered with. In addition, if their friend is a female it will be displayed with a hotpink colored borderline, while the males will have a teal borderline. If the user made a mistake when registering the friend, he or she may choose to undo that action or reset the entire interface back to its beginning state. And finally, they will be able to change their interface theme color in case they like dark over light, or vice versa.
Here is what that will look like:
Light
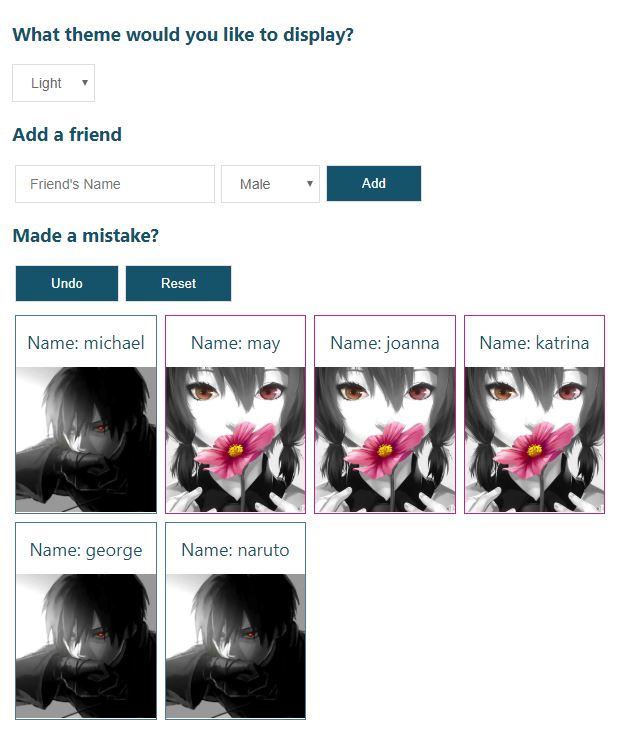
Dark
Without further ado, let's begin!
In this tutorial we are going to quickly generate a react project with create-react-app.
(If you want to get a copy of the repository from github, click here).
Go ahead and create a project using the command below. For this tutorial i’ll call our project undo-reset.
npx create-react-app undo-resetNow go into the directory once it's done:
cd undo-resetInside the main entry src/index.js we're going to clean it up a bit:
src/index.js
import React from 'react'
import ReactDOM from 'react-dom'
import App from './App'
import './styles.css'
import * as serviceWorker from './serviceWorker'

ReactDOM.render(<App />, document.getElementById('root'))
serviceWorker.unregister()
Here are the starting styles:
src/styles.css
body {
  margin: 0;
  font-family: -apple-system, BlinkMacSystemFont, 'Segoe UI', 'Roboto',
    'Oxygen', 'Ubuntu', 'Cantarell', 'Fira Sans', 'Droid Sans',
    'Helvetica Neue', sans-serif;
  -webkit-font-smoothing: antialiased;
  -moz-osx-font-smoothing: grayscale;
}
Now create src/App.js. This will render all the components we'll be building throughout the tutorial:
src/App.js
import React, { useState } from 'react'

const App = () => {
  const [name, setName] = useState('')
  const [gender, setGender] = useState('Male')
  const onNameChange = (e) => setName(e.target.value)
  const onGenderChange = (e) => setGender(e.target.value)

  return <div />
}

export default App
Since we'll be letting the user add their friends and specifying the names and genders, we defined a couple of react hooks to hold the input values and we'll also define the methods to update them.
We'll then implement the elements and input fields that the hooks will attach themselves to:
src/App.js
const App = () => {
  const [name, setName] = useState('')
  const [gender, setGender] = useState('Male')
  const onNameChange = (e) => setName(e.target.value)
  const onGenderChange = (e) => setGender(e.target.value)

  return (
    <div>
      <form className="form">
        <div>
          <input
            onChange={onNameChange}
            value={name}
            type="text"
            name="name"
            placeholder="Friend's Name"
          />
        </div>
        <div>
          <select onChange={onGenderChange} name="gender" value={gender}>
            <option value="Male">Male</option>
            <option value="Female">Female</option>
            <option value="Other">Other</option>
          </select>
        </div>
        <div>
          <button type="submit">Add</button>
        </div>
      </form>
    </div>
  )
}
src/styles.css
form {
  display: flex;
  align-items: center;
}

form > div {
  margin: auto 3px;
}

input,
select {
  transition: all 0.15s ease-out;
  border: 1px solid #ddd;
  padding: 10px 14px;
  outline: none;
  font-size: 14px;
  color: #666;
}

input:hover,
select:hover {
  border: 1px solid #c6279f;
}

select {
  cursor: pointer;
  padding-top: 9px;
  padding-bottom: 9px;
}

button {
  transition: all 0.15s ease-out;
  background: #145269;
  border: 1px solid #ddd;
  padding: 10px 35px;
  outline: none;
  cursor: pointer;
  color: #fff;
}

button:hover {
  color: #145269;
  background: #fff;
  border: 1px solid #145269;
}

button:active {
  background: rgb(27, 71, 110);
  border: 1px solid #a1a1a1;
  color: #fff;
}
Now I don't like to keep my interface super plain in my tutorials--after all, I do value your time put into reading my posts, so I provided some thought into the styles to keep you away from boredom :)
Next, we need a solid place to put the undo and reset logic in, so we'll create a custom hook that will handle state updates:
src/useApp.js
const useApp = () => {
  const onSubmit = (e) => {
    e.preventDefault()
    console.log('Submitted')
  }

  return {
    onSubmit,
  }
}

export default useApp
The onSubmit above is going to be passed into the form we defined earlier, which will help append friends to the friends list when the user submits them:
src/App.js
import React, { useState } from 'react'
import useApp from './useApp'

const App = () => {
  const { onSubmit } = useApp()

  const [name, setName] = useState('')
  const [gender, setGender] = useState('Male')
  const onNameChange = (e) => setName(e.target.value)
  const onGenderChange = (e) => setGender(e.target.value)

  return (
    <div>
      <form className="form" onSubmit={onSubmit({ name, gender })}>
        <div>
          <input
            onChange={onNameChange}
            value={name}
            type="text"
            name="name"
            placeholder="Friend's Name"
          />
        </div>
        <div>
          <select onChange={onGenderChange} name="gender" value={gender}>
            <option value="Male">Male</option>
            <option value="Female">Female</option>
            <option value="Other">Other</option>
          </select>
        </div>
        <div>
          <button type="submit">Add</button>
        </div>
      </form>
    </div>
  )
}

export default App
Something to note here is that onSubmit is given the field parameters as arguments. If we look back at our onSubmit handler it isn't a higher order function. That means it will become invoked immediately as the component mounts, so we need to convert the onSubmit handler to be a higher order function to bypass that as well as giving it the ability to receive the values of the fields:
src/useApp.js
const useApp = () => {
  const onSubmit = (friend) => (e) => {
    e.preventDefault()
    console.log(friend)
  }

  return {
    onSubmit,
  }
}

export default useApp
So far, we have this:
Next we'll start implementing the logic. But first, we need to define the state structure:
src/useApp.js
const initialState = {
  friends: [],
  history: [],
}
The most important part of this tutorial is history. When the user submits an action, we're going to capture the state of the app and safely store it in a place where we can reference later to undo user actions. This "storage" is state.history which only our custom hook needs to know about. However, it can also be used in the user interface for interesting functionality--like allowing the user to view their previous actions through a grid and choosing which one to go back to. That is a handy little feature to wow your users!
Next, we're going to add the switch cases in the reducer so that our state can actually update:
src/useApp.js
const reducer = (state, action) => {
  switch (action.type) {
    case 'add-friend':
      return {
        ...state,
        friends: [...state.friends, action.friend],
        history: [...state.history, state],
      }
    case 'undo': {
      const isEmpty = !state.history.length
      if (isEmpty) return state
      return { ...state.history[state.history.length - 1] }
    }
    default:
      return state
  }
}
When we dispatch an action with type 'add-friend', we went ahead and added the new friend to the list. But what the user doesn't know is that we are silently saving their previous edits. We captured the most recent state of the app and saved it in the history array. This way, if the user ever wants to come back to a previous state we can help them make that happen :)
Since we're using a react hook api, we musn't forget to import it from react. We also need to define the useReducer implementation inside our custom hook so that we acquire the api to send signals to update our local state:
src/useApp.js
import { useReducer } from 'react'

// ... further down inside the custom hook:
const [state, dispatch] = useReducer(reducer, initialState)
Now that we acquired the apis, let's incorporate them to places that need it:
src/useApp.js
const onSubmit = (friend) => (e) => {
  e.preventDefault()
  if (!friend.name) return
  dispatch({ type: 'add-friend', friend })
}

const undo = () => {
  dispatch({ type: 'undo' })
}
Here's what our custom hook looks like so far:
src/useApp.js
import { useReducer } from 'react'

const initialState = {
  friends: [],
  history: [],
}

const reducer = (state, action) => {
  switch (action.type) {
    case 'add-friend':
      return {
        ...state,
        friends: [...state.friends, action.friend],
        history: [...state.history, state],
      }
    case 'undo': {
      const isEmpty = !state.history.length
      if (isEmpty) return state
      return { ...state.history[state.history.length - 1] }
    }
    default:
      return state
  }
}

const useApp = () => {
  const [state, dispatch] = useReducer(reducer, initialState)

  const onSubmit = (friend) => (e) => {
    e.preventDefault()
    if (!friend.name) return
    dispatch({ type: 'add-friend', friend })
  }

  const undo = () => {
    dispatch({ type: 'undo' })
  }

  return {
    ...state,
    onSubmit,
    undo,
  }
}

export default useApp
Next, we're going to need to render the list of friends that are inserted into state.friends so that the user can see them in the interface:
src/App.js
const App = () => {
  const { onSubmit, friends } = useApp()

  const [name, setName] = useState('')
  const [gender, setGender] = useState('Male')
  const onNameChange = (e) => setName(e.target.value)
  const onGenderChange = (e) => setGender(e.target.value)

  return (
    <div>
      <form className="form" onSubmit={onSubmit({ name, gender })}>
        <div>
          <input
            onChange={onNameChange}
            value={name}
            type="text"
            name="name"
            placeholder="Friend's Name"
          />
        </div>
        <div>
          <select onChange={onGenderChange} name="gender" value={gender}>
            <option value="Male">Male</option>
            <option value="Female">Female</option>
            <option value="Other">Other</option>
          </select>
        </div>
        <div>
          <button type="submit">Add</button>
        </div>
      </form>
      <div className="boxes">
        {friends.map(({ name, gender }, index) => (
          <FriendBox key={`friend_${index}`} gender={gender}>
            <div className="box-name">Name: {name}</div>
            <div className="gender-container">
              <img src={gender === 'Female' ? female : male} alt="" />
            </div>
          </FriendBox>
        ))}
      </div>
    </div>
  )
}
If you're wondering what this odd line is doing:
<img src={gender === 'Female' ? female : male} alt="" />I actually just provided my own images to render on the img element in order to easily differentiate between a female and male in the interface--for demonstration purposes. Those of you who are cloning the repository will be able to see them in the src/images directory if you need a copy of them :)
We import the female/male images at the top of App.js, and right above the App component we'll define a FriendBox component which will be responsible for rendering a friend box as the user adds to them to the list:
src/App.js
// At the top
import female from './images/female.jpg'
import male from './images/male.jpg'

// Somewhere above the App component
const FriendBox = ({ gender, ...props }) => (
  <div
    className={cx('box', {
      'teal-border': gender === 'Male',
      'hotpink-border': gender === 'Female',
    })}
    {...props}
  />
)
In order to further differentiate between a female and male in a visual perspective, I additionally added in basic styles to represent each:
src/styles.css
.teal-border {
  border: 1px solid #467b8f;
}

.hotpink-border {
  border: 1px solid #c1247d;
}
And here is what we have so far for the App.js file:
src/App.js
import React, { useState } from 'react'
import cx from 'classnames'
import female from './images/female.jpg'
import male from './images/male.jpg'
import useApp from './useApp'

const FriendBox = ({ gender, ...props }) => (
  <div
    className={cx('box', {
      'teal-border': gender === 'Male',
      'hotpink-border': gender === 'Female',
    })}
    {...props}
  />
)

const App = () => {
  const { onSubmit, friends } = useApp()

  const [name, setName] = useState('')
  const [gender, setGender] = useState('Male')
  const onNameChange = (e) => setName(e.target.value)
  const onGenderChange = (e) => setGender(e.target.value)

  return (
    <div>
      <form className="form" onSubmit={onSubmit({ name, gender })}>
        <div>
          <input
            onChange={onNameChange}
            value={name}
            type="text"
            name="name"
            placeholder="Friend's Name"
          />
        </div>
        <div>
          <select onChange={onGenderChange} name="gender" value={gender}>
            <option value="Male">Male</option>
            <option value="Female">Female</option>
            <option value="Other">Other</option>
          </select>
        </div>
        <div>
          <button type="submit">Add</button>
        </div>
      </form>
      <div className="boxes">
        {friends.map(({ name, gender }, index) => (
          <FriendBox key={`friend_${index}`} gender={gender}>
            <div className="box-name">Name: {name}</div>
            <div className="gender-container">
              <img src={gender === 'Female' ? female : male} alt="" />
            </div>
          </FriendBox>
        ))}
      </div>
    </div>
  )
}

export default App
The styles used for the boxes here are:
src/styles.css
.boxes {
  margin: 10px 0;
  padding: 3px;
  display: grid;
  grid-gap: 10px;
  grid-template-columns: repeat(3, 1fr);
  grid-template-rows: 1fr;
}

.box {
  font-size: 18px;
  display: flex;
  justify-content: center;
  align-items: center;
  flex-direction: column;
  width: 100%;
  height: 100%;
  overflow: hidden;
}

.box-name {
  display: flex;
  align-items: center;
  height: 50px;
}

.box.gender-container {
  position: relative;
}

.box img {
  object-fit: cover;
  width: 100%;
  height: 100%;
}
Oh, bummer! One thing we forgot to do is bring in the undo method so we can use it in the interface! Go ahead and destructure that out from useApp and place it on the Undo button:
src/App.js
const App = () => {
  const { onSubmit, friends, undo } = useApp()

  const [name, setName] = useState('')
  const [gender, setGender] = useState('Male')
  const onNameChange = (e) => setName(e.target.value)
  const onGenderChange = (e) => setGender(e.target.value)

  const resetValues = () => {
    setName('')
    setGender('Male')
  }

  return (
    <div>
      <form className="form" onSubmit={onSubmit({ name, gender }, resetValues)}>
        <div>
          <input
            onChange={onNameChange}
            value={name}
            type="text"
            name="name"
            placeholder="Friend's Name"
          />
        </div>
        <div>
          <select onChange={onGenderChange} name="gender" value={gender}>
            <option value="Male">Male</option>
            <option value="Female">Female</option>
            <option value="Other">Other</option>
          </select>
        </div>
        <div>
          <button type="submit">Add</button>
        </div>
      </form>
      <div className="undo-actions">
        <div>
          <button type="button" onClick={undo}>
            Undo
          </button>
        </div>
      </div>
      <div className="boxes">
        {friends.map(({ name, gender }, index) => (
          <FriendBox key={`friend_${index}`} gender={gender}>
            <div className="box-name">Name: {name}</div>
            <div className="gender-container">
              <img src={gender === 'Female' ? female : male} alt="" />
            </div>
          </FriendBox>
        ))}
      </div>
    </div>
  )
}
Now when the user hits the Undo button, their last action should be restored!
Everything's going perfectly as planned. The user is able to add their friends to the list, easily notice which ones are female and male in the interface, and undo their previous submissions.
...did you also notice that there's now a resetValues method in the App component, where it is being passed in to onSubmit as the second argument? One thing that might feel a little bit odd for users is that their input isn't clearing after they submit a friend. Do they still need that same name there? Unless they have two or three friends with the same name, they're sure to hit their backspace button and clear it themselves. But we as developers have the ability to make their lives easier, so that's why we implemented a resetValues.
Having said that, it should be declared as the second parameter to onSubmit since we passed it in as the second argument in the UI component:
src/useApp.js
const useApp = () => {
  const [state, dispatch] = useReducer(reducer, initialState)

  const onSubmit = (friend, resetValues) => (e) => {
    e.preventDefault()
    if (!friend.name) return
    dispatch({ type: 'add-friend', friend })
    resetValues()
  }

  const undo = () => {
    dispatch({ type: 'undo' })
  }

  return {
    ...state,
    onSubmit,
    undo,
  }
}
Our undo feature should be working 100% fine by now, but i'm going to go a little further to make this a little more complex because an undo can be compatible with just about anything.
Therefore, we're going to allow the user to declare a theme color for the interface so that they won't get too bored of white:
src/useApp.js
const initialState = {
  friends: [],
  history: [],
  theme: 'light',
}
src/useApp.js
const reducer = (state, action) => {
  switch (action.type) {
    case 'set-theme':
      return { ...state, theme: action.theme, history: insertToHistory(state) }
    case 'add-friend':
      return {
        ...state,
        friends: [...state.friends, action.friend],
        history: insertToHistory(state),
      }
    case 'undo': {
      const isEmpty = !state.history.length
      if (isEmpty) return state
      return { ...state.history[state.history.length - 1] }
    }
    case 'reset':
      return { ...initialState, history: insertToHistory(state) }
    default:
      return state
  }
}
Also, I declared an insertToHistory utility to bring us extra benefits in case we passed in a weird value in the future for the state argument as you might have noticed above:
const insertToHistory = (state) => {
  if (state && Array.isArray(state.history)) {
    // Do not mutate
    const newHistory = [...state.history]
    newHistory.push(state)
    return newHistory
  }
  console.warn(
    'WARNING! The state was attempting capture but something went wrong. Please check if the state is controlled correctly.',
  )
  return state.history || []
}
I'd like to add that it's a very important habit to think ahead as your app gets larger and more complex.
Now continuing with the theme implementation, we'll define a custom method that the UI components can leverage:
src/useApp.js
const onThemeChange = (e) => {
  dispatch({ type: 'set-theme', theme: e.target.value })
}

return {
  ...state,
  onSubmit,
  undo,
  onThemeChange,
}
Applying the theme components and the method to the interface:
src/App.js
import React, { useState } from 'react'
import cx from 'classnames'
import female from './images/female.jpg'
import male from './images/male.jpg'
import useApp from './useApp'

const FriendBox = ({ gender, ...props }) => (
  <div
    className={cx('box', {
      'teal-border': gender === 'Male',
      'hotpink-border': gender === 'Female',
    })}
    {...props}
  />
)

const App = () => {
  const { onSubmit, friends, undo, theme, onThemeChange } = useApp()

  const [name, setName] = useState('')
  const [gender, setGender] = useState('Male')
  const onNameChange = (e) => setName(e.target.value)
  const onGenderChange = (e) => setGender(e.target.value)

  const resetValues = () => {
    setName('')
    setGender('Male')
  }

  return (
    <div>
      <div>
        <h3>What theme would you like to display?</h3>
        <div>
          <select onChange={onThemeChange} name="theme" value={theme}>
            <option value="light">Light</option>
            <option value="dark">Dark</option>
          </select>
        </div>
      </div>
      <div>
        <h3>Add a friend</h3>
        <form
          className="form"
          onSubmit={onSubmit({ name, gender }, resetValues)}
        >
          <div>
            <input
              onChange={onNameChange}
              value={name}
              type="text"
              name="name"
              placeholder="Friend's Name"
            />
          </div>
          <div>
            <select onChange={onGenderChange} name="gender" value={gender}>
              <option value="Male">Male</option>
              <option value="Female">Female</option>
              <option value="Other">Other</option>
            </select>
          </div>
          <div>
            <button type="submit">Add</button>
          </div>
        </form>
      </div>
      <div>
        <h3>Made a mistake?</h3>
        <div className="undo-actions">
          <div>
            <button type="button" onClick={undo}>
              Undo
            </button>
          </div>
        </div>
      </div>
      <div className="boxes">
        {friends.map(({ name, gender }, index) => (
          <FriendBox key={`friend_${index}`} gender={gender}>
            <div className="box-name">Name: {name}</div>
            <div className="gender-container">
              <img src={gender === 'Female' ? female : male} alt="" />
            </div>
          </FriendBox>
        ))}
      </div>
    </div>
  )
}

export default App
Since we added the theme changing feature, it's probably a good idea to add in some conditional styles as well to accomodate the changes, right?
 <div className={cx({
    'theme-light': theme === 'light',
    'theme-dark': theme === 'dark',
  })}
  // ...rest of the component
And here are the styles for that:
src/styles.css
.theme-light,
.theme-dark {
  box-sizing: border-box;
  transition: all 0.15s ease-out;
  padding: 12px;
  min-height: 100vh;
}

.theme-light {
  color: #145269;
  background: #fff;
}

.theme-dark {
  color: #fff;
  background: #0b2935;
}
Awesome! Here is what our interface can do now!
Give yourselves a round of applause for making it this far!
Let's not celebrate yet though, because the title of this article also mentions a reset feature for the interface.
Let's do that now by defining the switch case right on the reducer that we currently have:
src/useApp.js
const reducer = (state, action) => {
  switch (action.type) {
    case 'set-theme':
      return { ...state, theme: action.theme, history: insertToHistory(state) }
    case 'add-friend':
      return {
        ...state,
        friends: [...state.friends, action.friend],
        history: insertToHistory(state),
      }
    case 'undo': {
      const isEmpty = !state.history.length
      if (isEmpty) return state
      return { ...state.history[state.history.length - 1] }
    }
    case 'reset':
      return { ...initialState, history: insertToHistory(state) }
    default:
      return state
  }
}
Now of course what that means next is having to define the method to signal that reducer for the state change. Don't forget to return it at the end of the hook!
src/useApp.js
const reset = () => {
  dispatch({ type: 'reset' })
}

const onThemeChange = (e) => {
  dispatch({ type: 'set-theme', theme: e.target.value })
}

return {
  ...state,
  onSubmit,
  onThemeChange,
  undo,
  reset,
}
Destructuring it from the hook in the UI component:
src/App.js
const { onSubmit, friends, undo, theme, onThemeChange, reset } = useApp()src/App.js
<div>
  <h3>Made a mistake?</h3>
  <div className="undo-actions">
    <div>
      <button type="button" onClick={undo}>
        Undo
      </button>
    </div>
    <div>
      <button type="button" onClick={reset}>
        Reset
      </button>
    </div>
  </div>
</div>
Last but not least, the styles used for those actions to align them horizontally:
src/styles.css
.undo-actions {
  display: flex;
  align-items: center;
}

.undo-actions > div {
  margin: auto 3px;
}
Result:
Don't you just love how resetting the interface is also being captured by undo?
If you chose to download and clone the repository, you will see slight modifications as shown below:
src/App.js
import React, { useState } from 'react'
import cx from 'classnames'
import useApp from './useApp'
import ThemeControl from './ThemeControl'
import AddFriend from './AddFriend'
import UndoResetControl from './UndoResetControl'
import Friends from './Friends'
import './styles.css'

const App = () => {
  const { friends, theme, onSubmit, onThemeChange, undo, reset } = useApp()

  const [name, setName] = useState('')
  const [gender, setGender] = useState('Male')
  const onNameChange = (e) => setName(e.target.value)
  const onGenderChange = (e) => setGender(e.target.value)

  const resetValues = () => {
    setName('')
    setGender('Male')
  }

  return (
    <div
      className={cx({
        'theme-light': theme === 'light',
        'theme-dark': theme === 'dark',
      })}
    >
      <ThemeControl theme={theme} onChange={onThemeChange} />
      <AddFriend
        onSubmit={onSubmit({ name, gender }, resetValues)}
        onNameChange={onNameChange}
        onGenderChange={onGenderChange}
        currentValues={{ name, gender }}
      />
      <UndoResetControl undo={undo} reset={reset} />
      <Friends friends={friends} />
    </div>
  )
}

export default App
It is the same code except I organized it to be a little more readable and maintainable by separating the components to their own files.
Bonus
Earlier in the beginning of the tutorial I mentioned an interface that you can display to users--giving them the option to choose which previous state of the app that they can revert back to if desired. Here is an example of that in use:

Conclusion
Undoing things is very useful to us because we humans never stop making mistakes... let's face the truth. I hope that means you found this to be really useful to you :)
See you guys next time and you can follow me if you want to read more from me in the future!