Extend Your React Electron Desktop App with TypeScript

This article will go over steps on how to extend an electron repo to support TypeScript as it may be a little complex due the differences between the main and renderer process
In a previous article, I went over steps on creating a desktop application software using Electron. This article will start off by cloning the repo and extending it to support TypeScript so that we get type checking capabilities while developing our desktop app.
TypeScript can help improve your app quality by informing you of type errors in your code, so it's a good idea to start integrating this into your development flow if you haven't already.
With that said, this is not a continuation tutorial, but we will be using the repo to extend it so that users like you and I can start taking advantage of TypeScript features when developing desktop apps.
And without further ado, let's get started! (Note: If you want to have a copy of the resulting repo that we will be building, visit this link)
The first thing we are going to do is to clone the repo.
After it's done, go into the directory and install the dependencies using the cli:
npm installOnce it's done installing the app, lets make sure that we have a working project by starting it up in dev mode:
npm startIf it was successful, you should see this window:
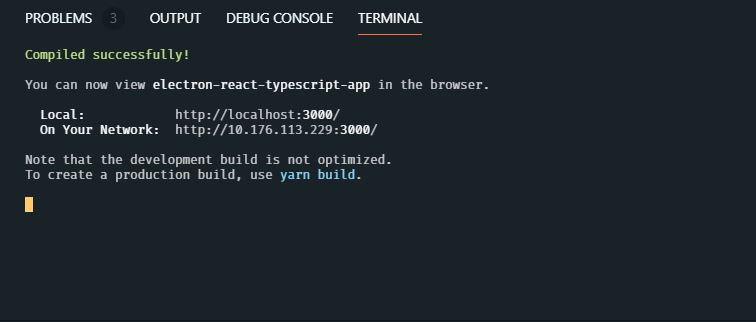
That started up our live hot reloadable web server for our react app.
Now go ahead and run electron:
npm run electronIf that was successful you should then see this window:
Great! Now that we know we have a working app, let's continue with installing TypeScript into the project:
npm i -D typescript(Note: -D is just an alias for --save-dev)
We're going to install eslint next. You might be wondering why I'm even bothering with eslint since it is mainly in concern with linting JavaScript.
The team behind tslint made an announcement earlier this year announcing their plans moving forward and decided that tslint will become deprecated in favor of eslint. As a result, tools were eventually developed onward that allowed developers to use eslint and typescript together.
@typescript-eslint/parser is a parser that turns our source code into an Abstract Syntax Tree (AST) that enables ESLint to be used with TypeScript by utilizing the TypeScript compiler. Read the link to find out more information.
We will also need to install @typescript-eslint/eslint-plugin
I'm going to list the packages that I regularly use in my react projects. You don't have to install all of them, but eslint and the bottom 5 of this list is what you 'll most definitely want to use in your projects:
- eslint
- eslint-config-airbnb
- eslint-config-prettier
- eslint-plugin-import
- eslint-plugin-jsx-a11y
- eslint-plugin-prettier
- eslint-plugin-react
- eslint-plugin-react-hooks
- @typescript-eslint/parser
- @typescript-eslint/eslint-plugin
So let's go ahead and install eslint and all of the others:
npm install -D eslint eslint-config-airbnb eslint-config-prettier eslint-plugin-import eslint-plugin-jsx-a11y eslint-plugin-prettier eslint-plugin-react eslint-plugin-react-hooks @typescript-eslint/parser @typescript-eslint/eslint-pluginLet's also not forget about typescript itself:
npm install -D typescriptNext, we're going to create a .eslintrc.js file in our root directory. Here's my .eslintrc.js:
module.exports = {
  parser: '@typescript-eslint/parser',
  parserOptions: {
    project: './tsconfig.json',
    ecmaFeatures: {
      jsx: true,
    },
  },
  env: {
    browser: true,
    jest: true,
  },
  extends: [
    'airbnb',
    'prettier',
    'prettier/react',
    'prettier/@typescript-eslint',
    'plugin:@typescript-eslint/recommended',
    'plugin:prettier/recommended',
  ],
  plugins: ['@typescript-eslint', 'react-hooks', 'prettier'],
  rules: {
    '@typescript-eslint/explicit-function-return-type': 'off',
    '@typescript-eslint/indent': 'off',
    '@typescript-eslint/explicit-member-accessibility': 'off',
    '@typescript-eslint/member-delimiter-style': 'off',
    '@typescript-eslint/no-use-before-define': 'off',
    '@typescript-eslint/no-explicit-any': 'off',
    '@typescript-eslint/camelcase': 'off',
    'arrow-parens': [2, 'always'],
    'arrow-body-style': 0,
    'consistent-return': 0,
    'css-modules/no-unused-class': 'off',
    camelcase: 0,
    'class-methods-use-this': 0,
    'comma-dangle': 0,
    'dot-notation': 0,
    eqeqeq: 0,
    'flowtype/no-types-missing-file-annotation': 0,
    'func-names': 'off',
    'import/prefer-default-export': 0,
    'import/no-extraneous-dependencies': 'off',
    'import/newline-after-import': 'off',
    'import/first': 'off',
    'import/no-extensions': 'off',
    'import/extensions': 'off',
    'import/no-unresolved': 'off',
    'import/no-useless-path-segments': 0,
    'import/no-absolute-path': 'off',
    'jsx-a11y/html-has-lang': 0,
    'jsx-a11y/alt-text': 0,
    'jsx-a11y/anchor-is-valid': 'off',
    'jsx-a11y/click-events-have-key-events': 'off',
    'jsx-a11y/href-no-hash': 0,
    'jsx-a11y/no-static-element-interactions': 0,
    'jsx-a11y/no-noninteractive-element-interactions': 0,
    'jsx-a11y/no-autofocus': 0,
    'jsx-a11y/label-has-associated-control': 0,
    'jsx-a11y/label-has-for': 0,
    'jsx-quotes': ['error', 'prefer-double'],
    'jsx-a11y/media-has-caption': 0,
    'jsx-a11y/anchor-has-content': 0,
    'linebreak-style': 0,
    'max-len': 0,
    'no-alert': 0,
    'no-case-declarations': 0,
    'no-underscore-dangle': 'off',
    'no-useless-escape': 'off',
    'no-trailing-spaces': 0,
    'no-multi-assign': 'off',
    'no-nested-ternary': 'off',
    'no-lonely-if': 'off',
    'no-plusplus': 'off',
    'no-loop-func': 'off',
    'no-unused-expressions': 0,
    'no-unused-vars': 1,
    'no-confusing-arrow': 0,
    'no-use-before-define': 0,
    'no-console': 0,
    'no-return-assign': 0,
    'no-restricted-properties': 0,
    'no-param-reassign': 0,
    'no-shadow': 0,
    'no-prototype-builtins': 0,
    'no-multiple-empty-lines': 0,
    'no-else-return': 0,
    'object-curly-spacing': ['error', 'always'],
    'object-property-newline': 0,
    'one-var': 0,
    'one-var-declaration-per-line': 0,
    'prettier/prettier': 0,
    'padded-blocks': 0,
    'prefer-template': 0,
    'prefer-destructuring': 0,
    quotes: 2,
    'react-hooks/exhaustive-deps': 'warn',
    'react-hooks/rules-of-hooks': 'error',
    'react/no-multi-comp': 0,
    'react/jsx-wrap-multilines': 0,
    'react/default-props-match-prop-types': 'off',
    'react/no-find-dom-node': 'off',
    'react/destructuring-assignment': 'off',
    'react/jsx-no-bind': 'off',
    'react/jsx-filename-extension': [
      'error',
      {
        extensions: ['.js', '.jsx', '.ts', '.tsx'],
      },
    ],
    'react/react-in-jsx-scope': 0,
    'react/prop-types': 0,
    'react/forbid-prop-types': 0,
    'react/no-children-prop': 0,
    'react/no-array-index-key': 0,
    'react/prefer-stateless-function': 'off',
    'react/sort-comp': 0,
    'react/no-unescaped-entities': 0,
    'react/jsx-no-bind': 0,
    'react/no-unused-state': 1,
    'react/no-unused-prop-types': 0,
    'react/jsx-pascal-case': 0,
    'react/no-danger': 0,
    'react/require-default-props': 0,
    'react/jsx-curly-spacing': 0,
    'react/jsx-max-props-per-line': 1,
    'space-in-parens': ['error', 'never'],
    'spaced-comment': 0,
    'space-infix-ops': 0,
    'space-unary-ops': 0,
    'space-before-function-paren': 0,
  },
  settings: {
    'import/resolver': {
      node: {
        moduleDirectory: ['node_modules', 'src'],
      },
    },
  },
}
Now when we implement TypeScript into an electron project it gets a little tricky. TypeScript is a typed superset of JavaScript that compiles code to plain JavaScript, which is what we want. But there might actually be an issue on this when building apps in electron that we might not have been aware of at first glance especially if we just started using electron.
The problem is that there are actually two types of processes that run in electron. One is called the main process and the other is the renderer process. When electron creates web pages they're created as renderer processes (which are essentially living in a browser environment). Electron can create and run multiple renderer processes at the same time, but ultimately there can only one main process.
Since renderer processes are web pages, they're blocked from calling native GUI APIs because it would be a huge security concern to allow them to manage GUI resources. Electron enables a one way communication tunnel between the renderer and the main process by utilizing (ipcMain, ipcRenderer, or remote).
Because of this restriction, we must split the directories in such a way that we develop code for the main process separately apart from the renderer process so that we have TypeScript compile them separately. This is so that we don't create problems in the software from compiling together their code.
So lets look at our directory structure and see what we got:
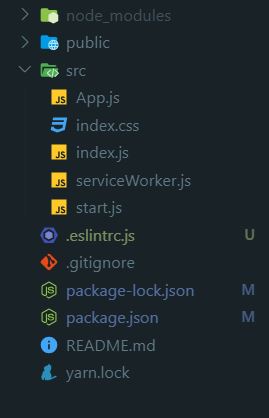
It looks like we have start.js which is the main process, living in the same directory as the code as the renderer process (App.js, index.js, index.css, etc). So we have to separate them, to something like this:
(Note: I renamed the files in the screenshot so that they are TypeScript files)
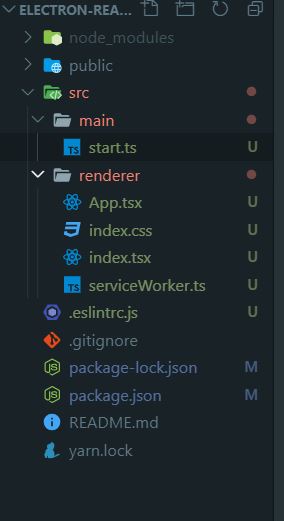
This is a good start. However, When we configure the typescript config file we have to specify a glob which TypeScript will use to include in all the files that it matches in the compilation including where to output them to. We're still stuck at the previous issue, so what we're going to do is to make the current root directory to be the parent directory which will hold the main and renderer process code.
We're also going to make both of them be independent repos so that we can gain the benefits of npm installing packages that only need to exposed to a specific process and vice versa. This will help give us an easier time debugging in the future from having our directories more abstracted and organized.
So what we're going to do is to move everything except the main directory to the renderer directory. The reason we do this is because this project was bootstrapped by create-react-app which is essentially already an environment inside a renderer process:

Now that we got the renderer repo out of the way, lets make the main process into its own repo next:
# step into the main directory
cd main
# initialize npm
npm initJust press enter through everything. Now open up the package.json and you should see a nearly empty package.json file:
{
  "name": "main",
  "version": "1.0.0",
  "description": "",
  "main": "index.js",
  "scripts": {
    "test": "echo \"Error: no test specified\" && exit 1"
  },
  "author": "",
  "license": "ISC"
}
What we're going to need to change here is the "main" part not because it's not a TypeScript file, but because this is the electron file we are going to be putting in our output directory when we run the build command later. When we build our app, we're going to initiate it inside the renderer directory so we need a clearer name:
{
  "name": "main",
  "version": "1.0.0",
  "description": "",
  "main": "./src/electron.js",
  "scripts": {
    "test": "echo \"Error: no test specified\" && exit 1"
  },
  "author": "",
  "license": "ISC"
}
You might be confused as to why we didn't write the name ending with a TypeScript extension like .ts. This is because we're going to create a electron.ts file which we will make TypeScript transpile it to .js in the same directory, and when we run the build command in the renderer directory later, we are going to programmatically copy this file and send it to the renderer's output directory which will be build.
So in order to get TypeScript to compile this file, we're going to install TypeScript in the main repo:
npm install -D typescriptThen we're going to create a tsconfig.json in its root directory:
{
  "compilerOptions": {
    "target": "es5",
    "lib": ["dom", "dom.iterable", "esnext"],
    "allowJs": true,
    "skipLibCheck": true,
    "esModuleInterop": true,
    "allowSyntheticDefaultImports": true,
    "strict": true,
    "forceConsistentCasingInFileNames": true,
    "module": "esnext",
    "moduleResolution": "node",
    "resolveJsonModule": true,
    "isolatedModules": true,
    "noEmit": true,
    "jsx": "preserve"
  },
  "include": ["src"]
}
We're going to treat this as a typical repo for developing as we don't want any unnecessary confusions going back and forth switching inbetween, so we'll create a src directory and move the start.ts file right into it.
This start.ts file will be the electron.ts file that will be compiled right into electron.js.
Also, don't forget to install electron:
npm install electron && npm install -D @types/electron electron-is-devIn addition, we're going to install the nodemon package so that we acquire auto restart capabilities when we combine it with electron-reload (electron-reload is used to restart the main process when we make changes to it):
npm install --save-dev nodemon electron-reloadNext we're going to add the start command to the scripts section:
{
  "name": "main",
  "version": "1.0.0",
  "description": "",
  "main": "./src/electron.js",
  "scripts": {
    "start": "cross-env NODE_ENV=dev nodemon --exec \"electron src/electron.js\" && tsc ./src/electron.ts -w"
  },
  "author": "",
  "license": "ISC",
  "dependencies": {
    "electron": "^6.0.12"
  },
  "devDependencies": {
    "@types/electron": "^1.6.10",
    "concurrently": "^5.0.0",
    "cross-env": "^6.0.3",
    "electron-is-dev": "^1.1.0",
    "electron-reload": "^1.5.0",
    "nodemon": "^1.19.3",
    "typescript": "^3.6.4"
  }
}
And this is our electron.ts file:
import { app, BrowserWindow } from 'electron'
import * as path from 'path'
import * as isDev from 'electron-is-dev'
import 'electron-reload'
let mainWindow
function createWindow() {
mainWindow = new BrowserWindow({
width: 800,
height: 600,
webPreferences: {
nodeIntegration: true,
},
})
mainWindow.loadURL(
isDev
? 'http://localhost:3000'
: `file://${path.join(__dirname, '../build/index.html')}`,
)
mainWindow.on('closed', () => {
mainWindow = null
})
}
app.on('ready', createWindow)
app.on('window-all-closed', () => {
if (process.platform !== 'darwin') {
app.quit()
}
})
app.on('activate', () => {
if (mainWindow === null) {
createWindow()
}
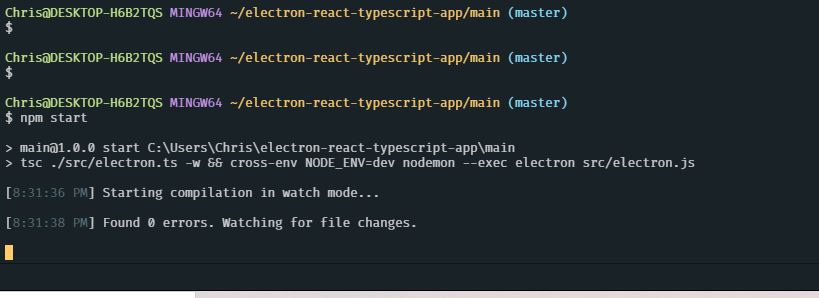
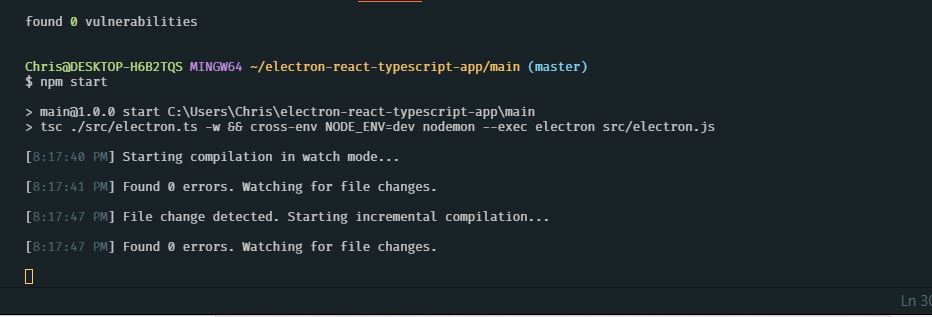
})Great! Now when we run npm start our main process should run successfully, in addition to automatically re-compiling electron.ts to electron.js on changes:
Now lets move back into the renderer directory because there are a couple of things we still need to do.
# move back out to the parent directory
cd ..
# move into the renderer directory
cd rendererNote: If you're missing a tsconfig.json file, create it:
{
  "compilerOptions": {
    "allowJs": true,
    "allowSyntheticDefaultImports": true,
    "esModuleInterop": true,
    "forceConsistentCasingInFileNames": true,
    "isolatedModules": true,
    "jsx": "preserve",
    "lib": ["dom", "dom.iterable", "esnext"],
    "module": "esnext",
    "moduleResolution": "node",
    "noEmit": true,
    "skipLibCheck": true,
    "strict": false,
    "target": "es5",
    "resolveJsonModule": true
  },
  "include": ["src"]
}
If all goes well, we should now have two working processes!
Go into your renderer process directory and run npm start where you should see a working and running server as expected:
And finally, open up another terminal, go into your main process directory and run npm start as well. It should be working as well:
Hurray! We finally did it! We can now start almost developing! Wait, what?
Yes, that's right. We're not completely done yet. Have you noticed that when you make changes to the main process code, electron is not reloading? We're going to need the wait-on package to call the shots on when to execute the electron.js file. This perfectly solves our problem since it waits until http requests return a 200 code and then it will continue to execute the script when the app is ready to continue.
We're also going to use concurrently so that we can run our commands at the same time since they can be run individually:
{
  "name": "main",
  "version": "1.0.0",
  "description": "",
  "main": "./src/electron.js",
  "scripts": {
    "start": "concurrently \"tsc ./src/electron.ts -w\" \"cross-env NODE_ENV=dev nodemon --exec \"\"wait-on http://localhost:3000 && electron src/electron.js\"\""
  },
  "author": "",
  "license": "ISC",
  "dependencies": {
    "electron": "^6.0.12"
  },
  "devDependencies": {
    "@types/electron": "^1.6.10",
    "concurrently": "^5.0.0",
    "cross-env": "^6.0.3",
    "electron-is-dev": "^1.1.0",
    "electron-reload": "^1.5.0",
    "nodemon": "^1.19.3",
    "typescript": "^3.6.4",
    "wait-on": "^3.3.0"
  }
}
Once you reach this point you can then begin developing your app code however you like. Remember, you're able to develop the main process separately from your renderer process but they will be packaged together when you package them with electron-builder.
Conclusion
And that concludes the end of this post! I hope you found this to be valuable and helped you gain a little more understanding on how you can integrate TypeScript into other projects! Look out for more in the future!